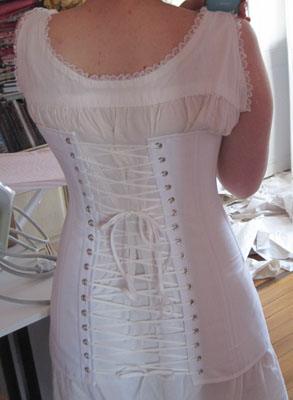
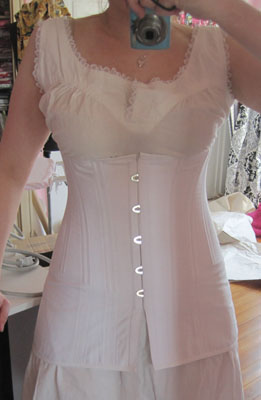
I finally got the grommet situation resolved, and just finished putting grommets in my corset! Here are a few pictures snapped while wearing the wrong chemise for it, and without tightening it properly from the waist down. (I was too excited and impatient to take pictures!)

It looks wonderful! Great job :) I have just started on my 1910's corset.... :/ I am rather nervous about it!
ReplyDeleteOoo! Looks great! The white is quite lovely and classic looking. Yay!
ReplyDelete:O beautiful! I wish I had one for my mary-poppins-movie-costume I am going to wear next week :)
ReplyDeleteVery nice!
ReplyDeleteWhat was your problem with the grommets? Mine split or become disorted no matter what I do. With a hammer, with the Vario pliers, with making a hole with the pliers, by using an awl.....NOTHING is working! What did YOU do that worked for you? Please answer me, this is just sooooo frustating! Your corset looks really good by the way. I hope mine will to and I'm on my second one due to the grommets problem :)
ReplyDeleteI SO hear you on grommet frustrations! I think it was literally months that my corset was done except grommets, while I went crazy trying to find a solution. My problem with the grommets is that I was used to using the kind you can get at JoAnn's (which turn out like the one pictured on the left here, and I could no longer find anyone who sold them, so I went crazy trying to buy replacement tools/grommets online and kept getting wrong sizes, one piece eyelets, etc. What finally worked for me was switching to the type of grommet that is shown on the right in that picture, which I made using this set.
ReplyDeleteSo, my routine is to first make a hole with the awl, and then widen it (with the awl, or switch to something like a chopstick or knitting needle if your awl doesn't taper enough) until I can just pop the grommet in, and no more. Then, I put the backing on, and lay everything on the die as described in the packaging. Make sure you are doing this on a very flat and very solid surface. I worked on the concrete floor in my basement (just laid some heavy duty paper down to protect my corset from any sawdust/dirtiness). I started out using a mallet, but I was having to bash it full force, and still, it wasn't setting. I switched to a hammer and with only three or four very light taps, the grommet was set.
I didn't have any that turned out quite like the one you showed on your blog, but my guess would be that would be caused either by having the grommet slip out of the grooves of the big metal bit in the kit, or, maybe by hammering a bit too hard? One of the issues I had was that I thought the grommet was not setting all the way, when actually, it was. I was concerned because I could peel the fabric back a bit, (like you can see on the right in this picture). I felt like the grommet must not be tight enough, but everyone said it was fine, and sure enough, I've worn the corset several times now and never had a problem. :)
If it would help, I could put a little video demonstration up on YouTube?
hello anyone know where I can get cut of the corset from 1910? thank you
ReplyDeleteDo you mean a pattern for a 1910s corset? If so, there are a couple of free ones available online:
Delete- Bridges on the Body (this is the one I used for my corset)
- Festive Attyre
Additionally, I know there is one in Nora Waugh's book "Corsets and Crinolines."
Hope this helps!