Monday, December 31, 2012

This year, I got distracted from costuming by fun new things like making dolls, and also by a couple of "small business" ideas I have (one of them being launching a small line of historic underpinning patterns, the first of which I hope to publish before the end of January 2013) but I still managed to make some new things this year!

1840s

blue and white dress, corded petticoat (finished UFO)

1910s

corset, simple slip, dotted swiss blouse, pinstripe skirt, hat

18th Century

yellow jacket, cream mitts

I also had some projects that I started, but didn't quite finish. . . So I guess this is a good start of a "goals" list for 2013! ;)

brown spotty two-piece Regency dress, 18c stays, 18c apron, 18c Taylor bonnet, Regency Lizzy Bennett bonnet, man's Regency shirt

Some things, I only patterned, but never made up, either because I got busy working on other projects, or because they are for my future pattern line. . . I don't have a picture of these as a result, but they are:
- 1910s bra (download for free!)
- 1910s princess petticoat
- 18th century side hoops

All in all, a pretty good year! I'm really excited about some of my 2013 plans, but I won't be posting about those until tomorrow! Have a safe and happy New Year's Eve, everyone!

Cream Mitts

I finally got around to seaming my cream 18c mitts the other day. Hooray for a finished project! I really need to block these, as you can see where the needles sat for a while without seeing any progress. ;)

Sunday, September 30, 2012

A Hand-Sewn 18th Century Jacket In A Day!

On Saturday, I had an 18th century event I wanted to attend. . . And on Friday, (yes I mean the day before!) I decided that I should turn this fabric:


Into this jacket:


In just the one day, and with doing the entire thing by hand - no machine involved!

Well, this is how far I got on day #1:


Not too shabby! I was able to get up the next morning and finish it enough to be able to wear it. . .


I really feel like this went pretty well, considering that I did not make a mock-up before cutting in to my fabric! I should have probably shortened it overall just a bit, as I'm pretty short-waisted and there's wrinkling there telling me it wishes to be shorter, but it's nothing too extreme. . . Really, I think the only things I need to fix are to move the shoulder strap, and rotate the sleeve. The pattern (which is the JP Ryan jackets pattern) had me lining up the sleeve so that the sleeve seam lines up with the bodice seam under the arm. This is not correct! If you do that, the nook for your elbow will be sticking out of the side/front of your arm. And that's why you see the end of the sleeve being all wrinkly on me! So, I'll need to rotate the sleeve a bit, and then I think it will be just about perfect.

All in all, I'm super happy with it! And now I know that I can hand-sew an entire 18th century jacket in less than 24 hours. In fact, I kept a little log of all the time I spent on it, and it actually came to 13 hours and 6 minutes! It actually should have taken a little longer than this because I didn't finish the second half of the jacket as nicely as I did the first half, and I've yet to make eyelets. . . Just for kicks, when I go to do all that, I'll have to track that time too!

Thursday, September 27, 2012

New stays are getting there. . .

Last night, I finally stopped procrastinating the part where I overstitch the panels together by hand, and sat in front of a good movie and went to town. It's almost done! Just a little more to go on the wedge-shaped pieces.


And then, I even remembered to wash out the markings before going to bed, so that it would be dry today in order to put boning in. . . Which is what I need to go do right about now! ;)

Friday, September 21, 2012

New stays!

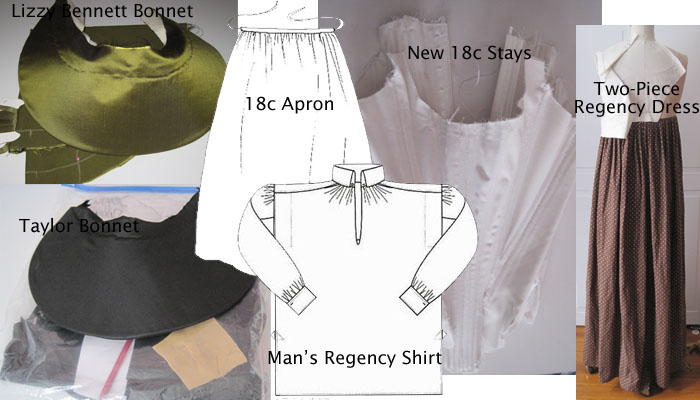
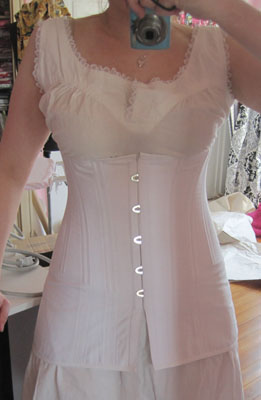
So I went a little crazy the other day and decided I needed new stays for an event I'm attending a week from Saturday! And that I also need other things, such as an apron, a flat cap, and maybe even a new jacket. . . What can I say? The 18th century sewing bug has bitten - and hard! It was around this time of year many moons ago when I first started falling in love with reproducing 18th century, so every year around this time I start getting obsessed with 18c all over again, and I'm sure that is helping me feel inspired to take on so much just now. ;)

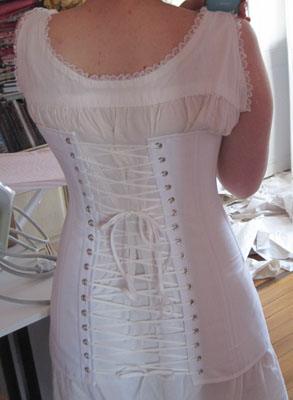
As much as I'd love beautifully period-correct, hand-sewn stays out of fine fabrics, with a deadline like that, I had to be sensible and take short cuts. That said, I also want those period-correct stays some day. So here's my happy medium, so far:


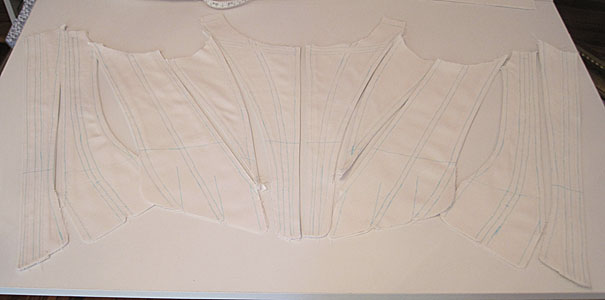
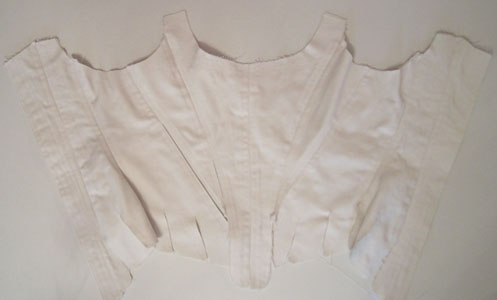
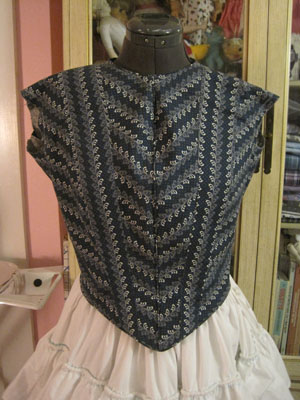
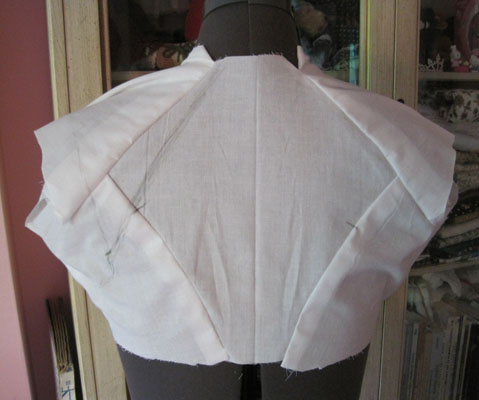
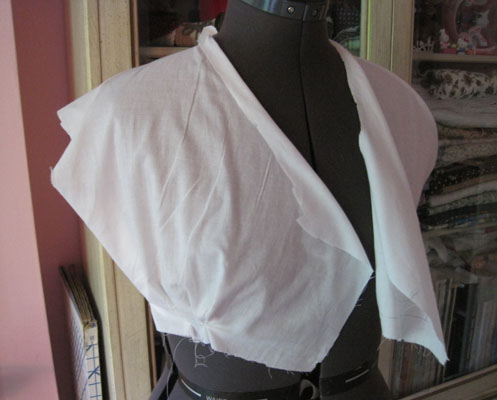
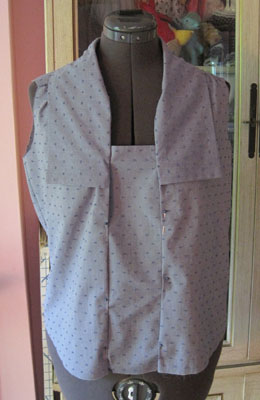
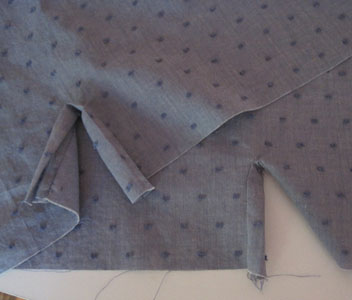
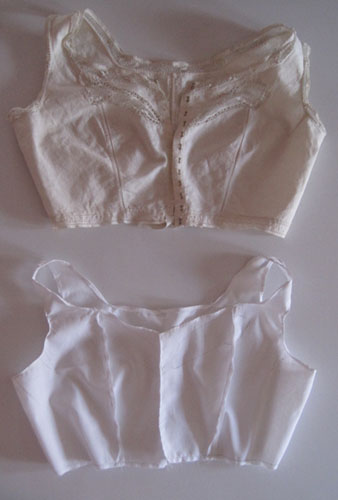
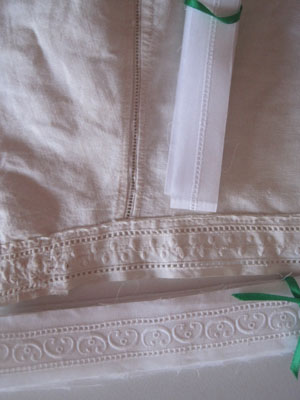
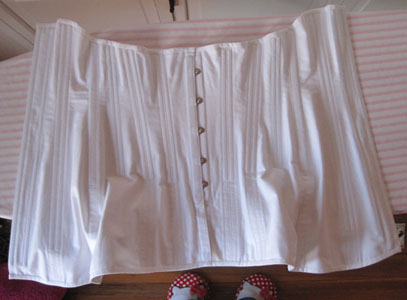
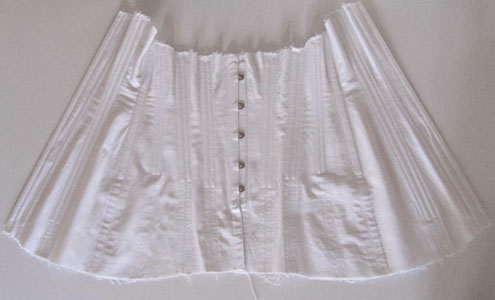
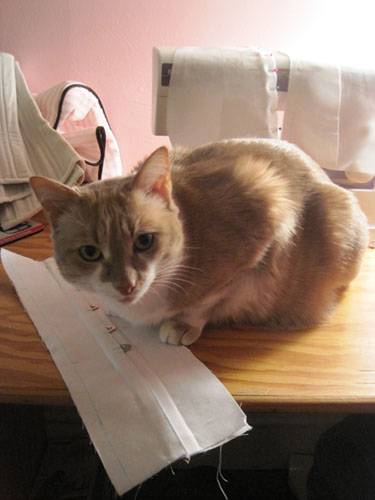
I did thus far by machine. This is a different construction method than I typically use. I'm used to constructing cover layer and lining layer separately, sewing them at CF and CB, and then flipping them, and sewing boning channels. What I've done here is turn the raw edges for each panel inwards, and sewn the cover layer to lining layer, and sewn all boning channels. . . (And the blue you're seeing is the washable marker, which I'm about to wash out - not stitching lines. I was boring and did the stitching in white. But hey, my previous stays are cream, and then pink with white, so I had no boring white stays yet!) So now, I'll whip the panels together by hand. . . And then I just need to wait for some missing boning lengths to arrive, and then it's just binding and eyelets. (Neither of which technically need to be done in order for them to be worn, so even if that boning arrives at the eleventh hour, I should be okay!)

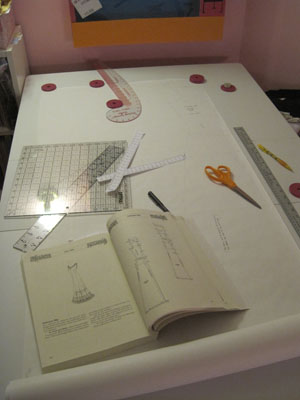
Oh, and for the record, this is the newer JP Ryan stays pattern (the one that has straps).

Wednesday, August 8, 2012

On a roll with the web site updates!

I figured I would just "get started" with setting up page templates for the events I need to add. . . But then I ended up going ahead and adding the event pics themselves!

Newly added:

- Pictures from the Regency Picnic 2012
- Pictures from the Library Stroll & Tea (Okay, those weren't newly added, but I seem to have uploaded the images right after the event, just never linked to them from the album page!)

Still to add:

- Pictures from Dress U 2012
- Pictures from Costume Con 2011

Belated Spring Cleaning. . .

Just doing a little housekeeping on the web site today. . .

- Updated the Dolls section to include the three newest additions.
- Added a "Patterns" section, which now links to the free 1910s bra pattern. Moved the Corded Petticoat tutorial over there too, because that seemed to make sense.
- Consolidated the "News" and "More" sections into one "Info" section which now has all the biographical and link info in one place.

Still to do in the near future. . .

- Massive update to the Events page. (How did I get to be almost an entire year behind on posting pictures from events?!?!?)
- Finally begin to upload some of the pictures I took of my antique clothing collection.

Friday, July 6, 2012

Changes for Felicity

It's been way too long that this project has sat, unfinished! Twenty-one years is a LONG time to long for one particular dress! ;) I'm presently on a little bit of a "summer vacation," and am dreaming of wearing this dress in Williamsburg this fall (I hope!) and so, I've picked back up where I left off. Which is, with an almost perfectly patterned bodice/sleeves/stomacher, and a partially made petticoat.

My goal here is still to find a happy medium between faithfully recreating the doll's dress, but also achieving some historical accuracy. One of the reasons I stalled on this project for a long time was because the doll's dress has the bodice back pieces and skirt back cut separately, yet every extant example of a dress from this era with a stomacher that I could find had the bodice and skirt cut in one, and then pleated down. I wasn't sure if I wanted to lean more towards the doll dress, or historical accuracy with this detail. In the end, I've decided to go with the separate bodice back and skirt pieces. I hope I'll some day find at least one surviving example supporting this, but even if not, I feel it is plausible that someone who was sewing a dress at home would like the stomacher-front that had been in fashion, and mix it up with the new fashion for cutting the bodice and skirt separately. And in the story, this dress is indeed homemade, partly by Felicity's mother, and then finished by Elizabeth's mother. That the dress was made by two different seamstresses helps my case for the possibility of the two styles being blended even more. Yes, I am a dork. ;)

So far today, I have cut everything out, and shortly will begin sewing it. . .

Dress pieces cut out

Saturday, June 9, 2012

And now with a hat!

Today I attended a stroll and tea which required a hat as part of the dress code, so of course I started mine last night. ;) This is just a cheap party store straw hat, which got soaked and shaped and left over night to dry - which it didn't! So this morning, I spent time going over it with my hair dryer, which got it mostly dry. Then I took a long strip of fabric and fashioned it into something bow-ish. It's not perfect, but hey, it worked! And, being ever so slightly damp meant I was able to shape it a bit more once I had it on. Here it is in the picture below, worn too far off to the side, because during the course of the stroll, I discovered this hat is definitely a two-hat-pin hat!

Wednesday, June 6, 2012

1840s Ensemble Finished!

Bodice #1 done! I managed to get sleeves that I really like, and actually, there are so few things I would end up changing about the bodice that I might not need to make a bodice #2 after all! And, skirt done as well. I did the bodice mostly by machine (except some hand finishing), but the skirt is entirely by hand. That is a LOT of cartridge pleating by hand! But, I just love the way it turned out. I can now live out the Jane Eyre fantasies I've had since I was little and first read Jane Eyre! ;)

Finished ensemble, front view Finished ensemble, back view

Finished ensemble, at piano

"You play A LITTLE, I see; like any other English school-girl; perhaps rather better than some, but not well."

Finished ensemble, tragically posed

Pining for Mr. Rochester on the moors! ;)

1910s Ensemble Finished!

I managed to finish the Armistice blouse (well, minus closures, as I have yet to find buttons I like well enough, and may just use hooks and eyes instead), as well as whip up a skirt from Butterick #4092, in time to wear at Dress U last weekend!

Finished ensemble, front view Finished ensemble, back view

Monday, May 28, 2012

1840s Dress!

The sleeves of this dress have been an all-out fiasco, and I'm not entirely sure this is exactly the bodice I wanted. . . But in the interest of getting it done in time for Dress U - and because I have enough fabric to make a whole second bodice if I don't like this one - I'm plunging forward!

Bodice in progress

Friday, May 18, 2012

Starting the 1840s dress. . .

I've set aside the bonnet for now, so I can focus on the dress, and get it done in time for Dress U 2012! Here is my first draft of the bodice, and with the petticoats. (First time wearing the petticoats over a corset! Though, I'm still not wearing a chemise, and it's not the right corset. . . That is a project for a future date, when I have more time!)

First mock-up of the bodice

And a bit closer up, front and back:

First mock-up of the bodice, front  First mock-up of the bodice, back

Lizzy Bennett bonnet is begun!

I've finally got around to putting this pattern of mine to good use! I've got the brim almost completely done, and the "pouf" is all gathered and ready to be attached. Here is the brim:

More on the Regency Two-Piece. . .

Done except for hooks and eyes!

Bodiced Skirt, Front   Bodiced Skirt, Back

It looks pretty much the same as in the last pictures, I know. . . But I assure you, it's not! Between those sets of pictures, it went from sloppily pleated/gathered, to beautiful practically uniform 1/2" pleats!

Bodiced Skirt, close-up of pleats

Also, I've started patterning the top half of this two-piece ensemble. . .

First mock-up of jacket, back

It doesn't look right yet, but, this is the first draft! You can see where I've penciled in potential changes to wher the seams land. I'm currently letting this simmer while I contemplate what I want to do with it. . . And meanwhile, here is the front, which needs a TON of work, but still, it's a start!

First mock-up of jacket, front

First steps towards a 1910s ensemble. . .

I've been plugging away at making the "Armistice Blouse" by Folkwear (#210), and so far, it's great! Seams and markings line up, and everything is well explained. Love it! The only thing I don't love is that I can not find buttons to match my fabric! So for now, the center panel is just pinned in place. . .

Armistice blouse, sans sleeves

The sleeves are under way too. . . I did the little plackets for the openings, but still need to assemble and attach the cuffs. . . And then set the sleeves in to the blouse of course!

Sleeve plackets

Wednesday, April 25, 2012

Brown Spotty Two-Piece: Underdress/Skirt/Thing

I've been slowly-but-surely working away on the brown spotty two-piece Regency dress. The underdress, or skirt-with-bodice, is almost done, and the jacket/bodice that goes over it is in the progress of being patterned. Before I went ahead and finished the underdress (aka, went pleat-crazy), I wanted to make sure I had the length right, so I just gathered and basted the skirts to the bodice. I decided it needs to be just a tad shorter, so I'll make that change, and go back and pleat instead of gather (as that's what the original had), and finish the center front, and this half of the ensemble will be done!

Here are a couple of pictures I snapped while fitting:


Sunday, April 15, 2012

New Project: Brown Spotty Two-Piece Dress, c. 1790-1800

I decided today is the day I would start this ensemble, starting with the "skirt," which is attached to a sleeveless bodice. I found it interesting that there is almost no shaping to the pieces of the bodice; there is just a side seam and the center front opening seam. I had my doubts as to whether or not I would be able to achieve a good fit without darts, but surprisingly enough, it worked! I think it has to do with how low-cut the bodice is in front. Now that my pattern is sorted out, and my fabric ironed and ready to go, I am ready to start actually sewing! I ripped my skirt panels, and will begin sewing them in front of a good movie tonight. . .

Friday, March 30, 2012

1910s Princess Slip Patterning

I decided to work on more of my underpinnings tonight. I probably should have resumed the 1910s brassiere, but I felt more like patterning than sewing, so I pulled out the Edwardian Modiste, and started working on scaling up the Princess Slip (page 344). This was my first time using the "American System of Cutting Rulers," and I am IN LOVE! I was able to choose the width based on my bust size, and length based on my real length. And since I'm short-waisted, I used one scale for the waist-up half of the pattern, but a larger scale for the waist-down. I feel like this could result in a fairly accurate pattern! The only adjustment I anticipate having to make is possibly letting out the waist area, because I have a feeling the average woman in 1909 had a smaller bust-to-waist ratio than I, even with my corset! I'll have to wait until I mock this up to know for sure. . .

Sunday, March 18, 2012

Finished 1910s Corset!

I finally got the grommet situation resolved, and just finished putting grommets in my corset! Here are a few pictures snapped while wearing the wrong chemise for it, and without tightening it properly from the waist down. (I was too excited and impatient to take pictures!)

Finished corset, back view Finished corset, front view

Monday, March 5, 2012

New Page: Free 1910s Brassiere Pattern!

I just wanted to let folks know that I have added a new page to my web site, for a free 1910s Brassiere pattern, which I have taken off an antique from my collection.


You can download the pattern, and read all about it: here

Enjoy! :)

Saturday, March 3, 2012

1910s Brassiere Reproduction

My 1910s corset still needs grommets. That tool I ordered ended up being the wrong one for the job, and so I had to place yet another order (this time I just ordered 1/4" grommets and will use my old tool) and then wait forever again. So, meanwhile, I got started on the brassiere. I'm copying an antique from my collection, and so far, have taken the pattern and made a quick mock-up of it. You can see both below. . .


I've also found some trimmings that will work great for the entredeux between seams and the trim along the bottom edge of the bra!


Now my only dilemma is what to do about the trimming that is inserted and matching trimming along the upper edge of the bra. I suspect it's bobbin lace, or some combination of lace techniques. . . But regardless of what it is, at present, I lack the skills to make a reproduction of it! So I must decide if I should just choose a lace I like for the top and do without inserts, or if I can come up with a better idea. . . Hmm. . .

Monday, February 20, 2012

1910s Corset, awaiting only grommets. . .

I applied binding to the corset today, but was unable to set in grommets as I did not have the right size setting tools. Usually, I buy size 0 grommets, but without thinking, I bought 00 this time, so I was faced with either buying more grommets or a new setting tool. I decided on the tool since I have a package of 100 size 00 grommets sitting here, and that could do several corsets! So now, I set this aside while I wait for my new grommet setting tool to arrive. . .

Sunday, February 12, 2012

1910s Corset Progress

I got derailed from the corset project by having to travel for work, and then bringing back a hideous cold. So the corset has been sitting looking like this for quite some time, awaiting only binding and grommets:

Friday, January 27, 2012

1910s Corset Assembly

I mocked up two of the three pattern options: the Bridges on the Body, and Jen Thompson's. Both corsets had very nice shapes, but the Bridges on the Body was almost the perfect size for me, so I went with that one. I cut out all the pieces the other day, and this evening, I began assembly. I didn't get too far - just put in the busk, sewed one other seam, and pinned one more. However, Taffy thinks I did a fine job with that busk. . .

Tuesday, January 10, 2012

New project!

So in light of the fact that my old 1910s corset was a pretty good shape, but had a busk that was too long - and was too long overall - and therefore would be totally uncomfortable. . . And the thought of trying to take it apart and alter it was revolting (and wouldn't save any money since I'd have to buy a new busk either way), I decided to go ahead and make a new corset.

Yesterday, I printed out my pattern options, cut them out, and taped them all together. Left to right they are the pattern everyone is using over at Bridges on the Body, the Teens Era Corset from Festive Attyre, and the c. 1911 corset from Corsets and Crinolines.


Not sure yet which one I will work with. It depends on the mocking up, which has yet to take place!